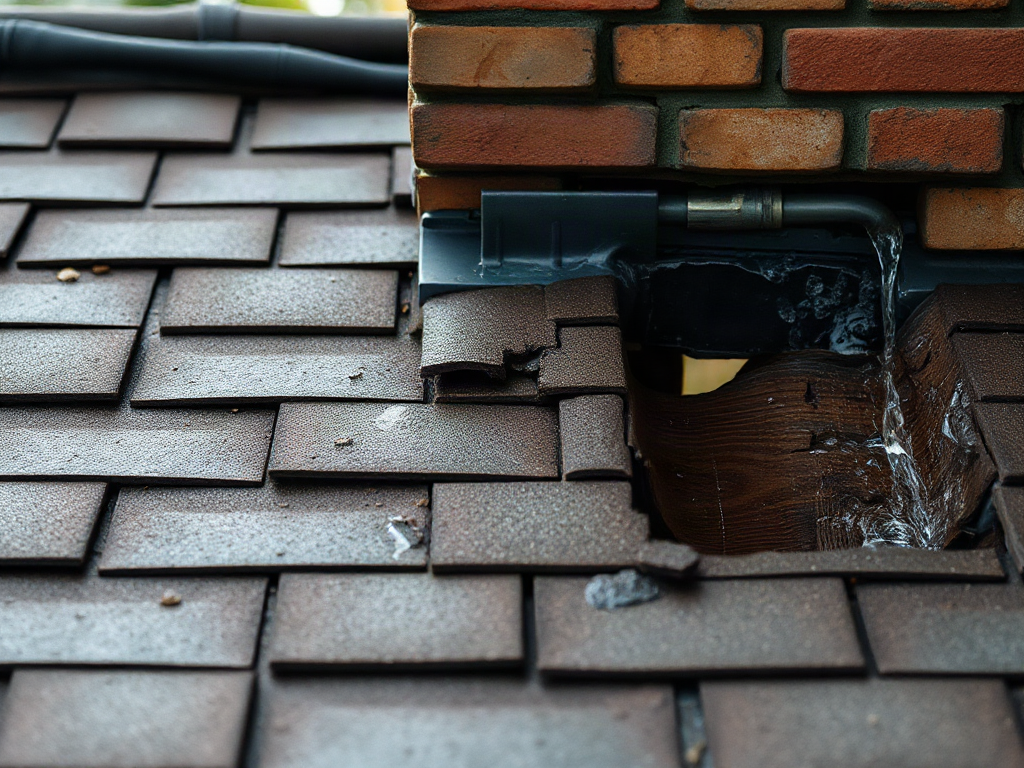
A roof leak after heavy rain most often enters through damaged flashing, failed seals around penetrations, open valleys, displaced shingles, or poorly protected roof edges. Wind-driven water can travel beneath the covering and along rafters before reaching the visible ceiling stain, so the drip location may not Inspect the attic during daylight for wet decking, darkened wood, damp insulation, and water tracks, but avoid wet wiring and unstable surfaces. Exterior inspection should wait until conditions are dry; active leaks, sagging ceilings, or widespread moisture warrant prompt attention from a qualified roofing contractor.
What you’ll learn
This guide covers the following practical points:
- Why Heavy Rain Reveals Roof Leaks — Heavy rain exposes openings that may remain dry during a brief shower.
- Most Likely Water Entry Points — Flashing transitions deserve priority because they join roof surfaces to chimneys, walls, skylights, dormers, and changes in slope.
- How to Trace the Leak Without Misreading the Stain — Begin indoors while preserving evidence from the storm.
- Temporary Response and Repair Decisions — Interior damage control should come before cosmetic work.
Why Heavy Rain Reveals Roof Leaks
Heavy rain exposes openings that may remain dry during a brief shower. Sustained water can overwhelm a marginal flashing detail, while wind pushes rain sideways beneath shingle edges, siding joints, vents, and counterflashing. A clogged drainage path can also hold water against places designed to shed it quickly rather than resist prolonged immersion.
The ceiling mark is usually the end of the water’s route, not its beginning. After entering above, moisture may follow roof decking, a rafter, a pipe, or the top of an insulation batt. It can then appear several feet away or one story below the defect. A stain near a chimney, for example, may come from uphill flashing rather than the chimney face directly above it.
Timing provides useful evidence. Leakage that begins only after hours of rain may point to saturation, backed-up drainage, or a small opening with a slow water path. A drip that starts immediately during wind from one direction more strongly suggests an exposed seam, lifted edge, wall intersection, or penetration on that side. Do not assume every wet ceiling is a roofing failure, however; plumbing leaks and attic condensation can produce similar marks.
Most Likely Water Entry Points
Flashing transitions deserve priority because they join roof surfaces to chimneys, walls, skylights, dormers, and changes in slope. Step flashing can leak when pieces are missing, improperly overlapped, or separated from adjacent siding. Chimney leaks may involve apron flashing, side flashing, counterflashing, cracked masonry joints, or the chimney cap, and sealing the visible edge alone may only hide the underlying defect.
Penetrations are another frequent source. Plumbing vent boots can split with age, metal collars can corrode, and exposed fasteners can loosen. Roof vents, satellite-mount holes, and skylights may leak where their flashing systems meet the roofing. Caulk is not a durable substitute for correctly layered flashing; a thick bead can temporarily divert water while trapping it behind the assembly.
Also examine the routes that concentrate runoff:
- Valleys: debris, damaged lining, poor shingle cuts, or misplaced fasteners can admit concentrated flow.
- Roof edges: missing drip edge, deteriorated underlayment, and loose starter shingles can allow wind-driven rain beneath the covering.
- Field shingles: creases, punctures, exposed nail heads, missing tabs, and failed repairs create localized openings.
- Low-slope areas: standing water and unsuitable materials increase the chance of water moving through seams.
Overflowing gutters can wet fascia and soffits, but they do not automatically prove that the gutter caused an interior leak. Look for a continuous moisture path before paying for a repair based only on proximity. Likewise, replacing a visibly damaged shingle may not resolve water entering through flashing several courses uphill.
How to Trace the Leak Without Misreading the Stain
Begin indoors while preserving evidence from the storm. Mark the outer edge of the ceiling stain lightly with a pencil, note when dripping began, and record wind direction if known. Photographs of the stain, attic conditions, and exterior elevations can help distinguish new spread from old discoloration during the next rainfall.
If the attic is safely accessible, use a bright flashlight and remain on structural framing or a proper walkway. Search above and uphill from the interior mark for damp insulation, shiny nail tips, darkened decking, mineral deposits, or narrow tracks on rafters. Wet insulation may need to be moved for inspection, but avoid disturbing electrical components and do not step between ceiling joists. A bulging ceiling can release water and material without warning, so keep people and belongings clear of the area.
Exterior observations should be made from the ground, a window, or with binoculars until the surface is completely dry. Note missing shingles, bent flashing, debris-filled valleys, displaced ridge caps, overflowing gutters, and seal failures around penetrations. Walking on a wet, steep, brittle, or storm-damaged roof creates a greater hazard and may cause additional damage.
Controlled hose testing may help a roofer isolate a stubborn leak after the roof dries. Water is applied to one small area at a time, beginning low and progressing upward while another person watches inside. Spraying the entire roof at once produces little diagnostic value, and testing is inappropriate where electrical exposure, unsafe access, or active structural damage is present.
Temporary Response and Repair Decisions
Interior damage control should come before cosmetic work. Move possessions, place a stable container beneath a drip, and document damage before cleanup. If water is near a light fixture, outlet, or electrical panel, stay clear and contact the appropriate emergency or electrical professional rather than handling wet equipment. Significant ceiling sagging, structural movement, or rapid water entry calls for urgent professional assessment.
A temporary tarp may reduce exposure, but installation requires safe access and secure attachment beyond the suspected opening. A poorly anchored tarp can tear loose, direct water under the roof covering, or create new fastener holes. Because storm conditions and ladders are a dangerous combination, temporary exterior protection is generally better handled by someone equipped for roofing work.
The repair scope should match the failure. A sound roof with one split vent boot may need a focused replacement, while repeated leaks around several penetrations can indicate aged materials or installation defects. Valley deterioration, widespread shingle damage, soft decking, or recurring repairs justify a broader inspection before more sealant is applied.
Ask a contractor to identify the observed entry point, the water path, the materials to be removed, and how flashing will be integrated with surrounding roofing. Signs of a successful repair include dry decking and no stain expansion through comparable rain. Fresh paint is not proof: allow the assembly to dry and verify performance before closing concealed areas or refinishing the ceiling.
Frequently Asked Questions
Why does my roof leak only during very heavy rain?
Long or wind-driven rain may push water through a marginal seam, saturate deteriorated materials, or overwhelm a blocked valley or drainage edge that sheds lighter rainfall successfully.
Is the roof opening directly above the ceiling stain?
Not necessarily. Water often follows decking, rafters, pipes, or insulation before dropping, so inspection should extend uphill and to both sides of the stain.
Can clogged gutters cause an interior roof leak?
They can contribute when backed-up water reaches vulnerable eaves, fascia, or adjoining roof details, but a verified moisture path is needed before assigning the cause to gutters alone.
Should roof cement or caulk be applied to the suspected opening?
Only as a compatible, limited temporary measure when appropriate. Smearing sealant across flashing can conceal the defect, trap water, and complicate a proper layered repair.
When does a rain leak require urgent professional help?
Seek prompt help for rapid water entry, a sagging ceiling, wet electrical fixtures, suspected structural damage, or any situation requiring access to a wet or steep roof.
Conclusion
Prioritize flashing, penetrations, valleys, damaged shingles, and vulnerable edges, but follow the moisture trail rather than choosing the nearest visible defect. Record the storm conditions, inspect the attic only where access is safe, and leave wet-roof work to properly equipped professionals. Repair the layered water-shedding detail—not merely the ceiling stain or a surface crack—and confirm the result during comparable rainfall before completing interior finishes.